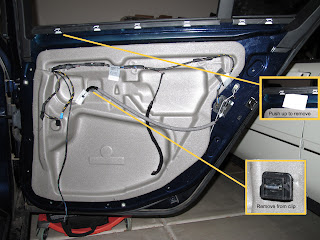
I couldn't find instruction on the web for my car model (E60) but I was able to piece together enough info to try on my own. Below are the tools I used:
- I don't have plastic prying tools so I use several old credit cards, flat head screw drivers and paint scraper. You will need them to pry open various snap-on fasteners.
- 10mm box wrench and socket to remove the window regulator bolts
- T30 Torx bit to remove the window mounting bolt
- Phillip head or bit screw driver
- Needle nose pliers
- Lithium grease to lubricate various parts of the window regulator
- I use power impact driver to help remove all the screw and bolts. This is a hard enough job already so I'll take any help to make it easier.
Make sure the window is in down position then start with removing the door panel (click on image to enlarge):
- See this E39 video for reference.
- Remove the 2 small screw head vanity covers (caution: they are fragile) then remove the screws.
- Remove the bottom light. It will pop out from the rear. Disconnect the wire.
- Use prying tools or a couple of old credit cards and flat head screw driver to pop out panel along 8 snap-in posts. You will hear a pop when each is out.
- This part is tricky. Pop out the top part of the panel slightly starting from the rear. Hold the door handle, lift up and pull out to free the center clip then wiggle, fold up slightly then pull out the panel. There are wiring connections on the back so don't pull out too far
- Disconnect all wire connectors. Careful with the power window switch connector because it has a stubborn snap on holder for the wire harness. I broke mine :( see picture below.
Remove the door lock cable and take out the door panel. Note where the plastic clip hooked onto the door panel center frame. At this time, it's on the door chassis center spring post but you will need to install this clip on the door panel as show below before assembling.
As mentioned above, remove the center plastic clip on the door chassis using a needle nose pliers to squeeze the spring post then pull it out. Remove the sound proofing foam after that. There is sticky gooey adhesive on its border so use a credit card or a dull steak knife to slice though but preserve it because you'll need to reuse it to stick the foam back. If you need to replace the goo, I think it's 3M Windo-Weld.
Remove the inside rubber molding on bottom of window starting from the front. Use the credit card with a paint scraper to do this (or use a proper plastic prying tool :)
Next, remove the plastic trim that wraps around the window frame. This is tricky but easier to remove than assemble! See this video of E39 for reference (it is simpler on on the E39 because it's in 2 pieces and you only have to remove the center part).
- Pry open the center part of the trim starting at the bottom then peel out toward the rear.
- Pry open the front bottom part of the trim then peel out to the top and back.
- The whole thing will just pop out once you get it started pass the upper front corner.
- Remove the 3 screws holding the center trim plate
- Loosen the center metal trim plate and pull it out slightly
- Pull out the rubber trim starting from the rear bottom part
- Pull out the center metal trim plate
- Remove the glass mounting bolt (T30) then pull the glass up and out. Store it in a safe place.
A new regulator on eBay costs about $60 to $100. Upon inspection, however, it was a plastic clip that broke and caused the cable to come loose so the window couldn't be raised. Instead of replacing the plastic clip (it looks flimsy), I just wired the cable ends in place.
Replace the window regulator then assemble in reverse order. Below are the reassembling notes:
- Don't install the center plastic clip on the door center post. Instead, slide it on the center panel frame before install (see the 4th picture above).
- Remove the 4 steel clips from the inside bottom rubber moldings, install them on the door first then pop in the rubber moldings. See picture below on how each clip should be on the door.
- The plastic trim that wraps around the window frame is hard to install. The key is to start at the front top corner then work your way all around. Use a soft credit card to help shim the corner onto frame. Again, use a credit card to help push all the outside rubber molding edges into the wrapping plastic trim. Use the other door as a guide to what it should look like.
- Don't forget to thread the bottom light's wire
- Don't forget to place the door lock post onto the panel before popping it on
- After connecting all the cables and wires, the door panel should just pop in easily. Align the center plastic to the center door post and top clips then push in starting at the center then top rear to the front.
Resetting the power window:
- Raise the window to the top
- Press and hold for 15-30 seconds
- Release
- Lower the window to the bottom
- Press and hold for 15-30 seconds
- Release


